GILDING 101
- The Bombay Lettering Company sanjana@bombaylettering.com
- Aug 4, 2022
- 4 min read

Updated: Aug 11, 2022
Hey Calligrapher, have you been seeing these super satisfying images and videos of gilding on Instagram these days and your hands are itching to try out this artform but...
.....it looks a tad bit intimidating and you don't know where to start from? We've got you covered!
After taking an intensive workshop with one of the best gilders - Helen White while I was in the UK this year - I want to demystify the process of gilding in the most traditional way possible by going over it step by step. It's of course not possible to cover every little detail in a blog because there's so much more to it than what meets the eye but our aim is to give you a brief introduction and help you get started with this intricate, therapeutic and beautiful artform.
To begin with, what is gilding or illumination?
Gilding is simple the process of applying a layer of gold to a given surface to beautify it. It’s an ancient art and takes a lot of precision, patience, and an eye for detail to master this craft.


What are the required materials?
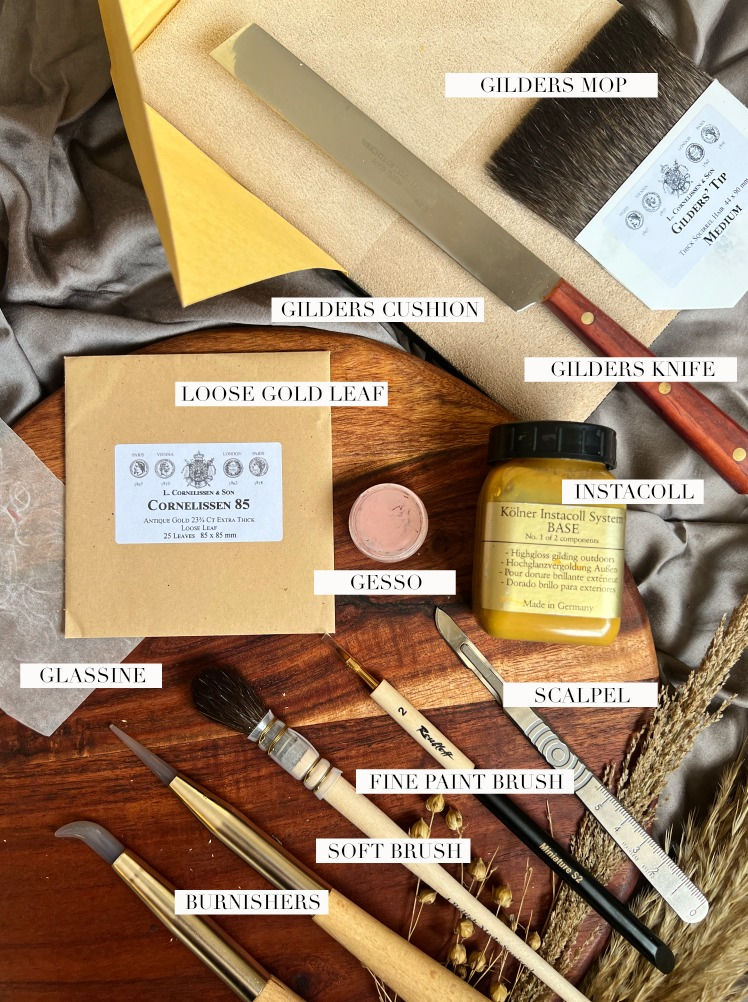
1. Paper - Choosing the right kind of paper is essential because your gilding takes the texture of the surface you’re working on. You will need heavy 300 GSM smooth paper as it should be able to withstand the application of the binder/gilding size.
2. Gilding Size - This is basically what binds the gold leaf with the paper and there are different options available. Traditionally the most commonly used base is gesso, it has to be hand-made with a 14th-century recipe. As written in the book “The Art Of Illuminated Letters”, “No photographic reproduction can adequately show the brilliant effect of raise gesso”
A popular alternative that we see in today’s day and age is called Instacoll, it comes in a ready-to-use bottle. PVA glue and Gum Ammoniac are a few more options.
3. Gold leaf - This can be bought in two ways - Loose and transfer. Transfer gold has gold stuck on a backing sheet and is relatively easier to use whereas Loose Gold comes sandwiched between two sheets. It’s super lightweight, a light blow and you’ll find shreds of gold flying on your desk haha.
If you’re using loose gold lead, you’ll need a lot more than just the leaves - 1. Gilder’s cushion 2. Gilder’s Knife 3. Glassine Paper 4. Gilder’s Tip 5. Squirrel Mop Brush
4. Burnisher - A burnisher is used to make the overall surface smooth and add more sheen to the final piece.
Let’s get started!
1. Create a pencil sketch of your design. It can be a combination of gilding, painting, and illustration.
2. Apply the gilding size, we'll be using gesso for this tutorial but you can alternatively use Instacol as well. Before we get started, here are a couple of things you wanna keep in mind -
You need to ensure that you're working at optimal temperature. Gesso is very sensitive to hot and humid climates, if you're based in a relatively cold place, great. If not, you wanna turn that AC on friend!
You need to work swiftly because Gesso can be worked on only once
Aim to get a good consistency of Gesso, it should be thin enough for you to be able to apply it and stiff enough to maintain the shape of your design.
How to apply Gesso?
We use a technique called 'spooning' to apply Gesso, it's very different from just dipping your brush into Gesso and painting on your sketch.
Once you've loaded the gesso onto your brush, you want to start with a heavy blob (lack of a better word haha) on the paper and drag the gesso out to cover the surface and create the desired shape. You're essentially spreading your gesso without the brush being in contact with your paper. This is very crucial to give that raised finish, failing which it'll look flat. Leave it for a couple of hours so it can dry!
If the gesso hasn't spread out evenly, you can always come in with a scalpel and give it a smooth finish. Once that's done, start burnishing it to make it smooth, this step is important as it adds shine to the final look.
3. Let's Gild + Burnish! We have one more step before we can start applying the gold leaf. To make sure the leaf sticks on well, we need to activate the tackiness of the Gesso which will act as an adhesive. To do so, you need to blow onto the applied layer of gesso, the most effective way of doing this is to create a paper funnel and breathe hard through that to get plenty of moisture on the surface.
Lay the sheet of loose gold on the gilder's cushion carefully, and cut the required size. Loose gold is a creature in itself, haha, handling it can be quite a task.
Once you've cut it, you want to use the Gilder's mop to pick up the gold leaf.
Now gently lay it on the gesso and press on that through glassine paper.
Once the leaf sticks onto the gesso, start burnishing - first through glassine paper ad then directly.
Then use the pointed burnisher to cut away the gold from around the edges.
Now remove the excess gold with a soft brush from all the corners of the design you're working on.
You can keep adding more layers of gold on top of this until full brilliance is achieved. The final piece will be able to reflect as beautifully as a mirror!
Click here to watch some process videos of Gilding ✨
If you're interested to explore Gilding furthermore, I'd highly recommend you check out this book -

Hope you find this blog helpful, share it on your Instagram stories and let us know, don't forget to tag us @bombaylettering ❤️


Comments